java GUI 设è®،
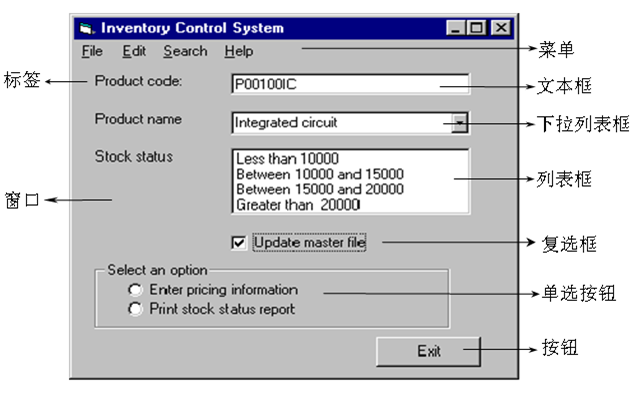
GUI(Graphical User Interfaces)ï¼ڑç”±هگ„ç§چه›¾ه½¢ه¯¹è±،组وˆگçڑ„用وˆ·ç•Œé¢ï¼Œهœ¨è؟™ç§چ用وˆ·ç•Œé¢ن¸‹ï¼Œç”¨وˆ·çڑ„ه‘½ن»¤ه’Œه¯¹ç¨‹ه؛ڈçڑ„وژ§هˆ¶وک¯é€ڑè؟‡â€œé€‰و‹©â€هگ„ç§چه›¾ه½¢ه¯¹è±،و¥ه®çژ°çڑ„م€‚
- وٹ½è±،çھ—هڈ£ه·¥ه…·هŒ…ï¼ڑ
- java.awtï¼ڑوڈگن¾›هں؛وœ¬GUI组ن»¶ï¼Œè§†è§‰وژ§هˆ¶ï¼Œç»که›¾ه·¥ه…·ç‰
- java.awt.eventï¼ڑن؛‹ن»¶ه¤„çگ†
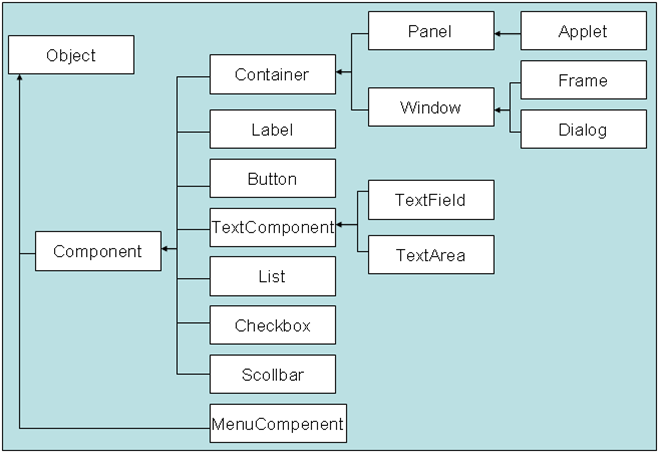
- 组ن»¶ه’Œه®¹ه™¨ï¼ڑ
ه¸ƒه±€ç®،çگ†ه™¨
- ه®¹ه™¨ه¯¹è±،.setLayout(ه¸ƒه±€ç®،çگ†ه™¨ه¯¹è±،)
- ه¸ƒه±€ç®،çگ†ه™¨ ه®¹ه™¨ه¯¹è±،.getLayout()
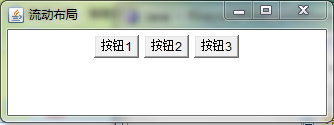
- FlowLayoutï¼ڑوµپه¼ڈه¸ƒه±€ï¼Œوک¯Panel(هڈٹه…¶هگ类)é»ک认ه¸ƒه±€ç®،çگ†ه™¨
- ه¸ƒه±€و•ˆوœï¼ڑ组ن»¶هœ¨ه®¹ه™¨ن¸وŒ‰ç…§هٹ ه…¥و¬،ه؛ڈé€گè،Œه®ڑن½چ,è،Œه†…ن»ژه·¦هˆ°هڈ³ï¼Œن¸€è،Œوژ’و»،هگژوچ¢è،Œم€‚组ن»¶وŒ‰هژںه§‹ه¤§ه°ڈè؟›è،Œوک¾ç¤؛
-

- و„é€ و–¹و³•
- public FlowLayout()ï¼ڑé»ک认ه±…ن¸ه¯¹é½گ
- public FlowLayout(int align)ï¼ڑوک¾ç¤؛设ه®ڑ组ن»¶ه¯¹ه…¶و–¹ه¼ڈ
- public FlowLayout(int align,int hgap,int vgap)ï¼ڑ设置و°´ه¹³ه’Œه‚ç›´é—´è·
- FlowLayout.LEFTه·¦ه¯¹é½گ
- FlowLayout.RIGHT هڈ³ه¯¹é½گ
- FlowLayout.CENTERه±…ن¸
import java.awt.*;
public class FlowLayoutDemo{
public static void main(String[] args) {
Frame f = new Frame("وµپهٹ¨ه¸ƒه±€");
Button b1 = new Button("وŒ‰é’®1");
Button b2 = new Button("وŒ‰é’®2");
Button b3 = new Button("وŒ‰é’®3");
f.setLayout(new FlowLayout());
f.add(b1);
f.add(b2);
f.add(b3);
f.setSize(200,300);
f.setVisible(true);
}
}
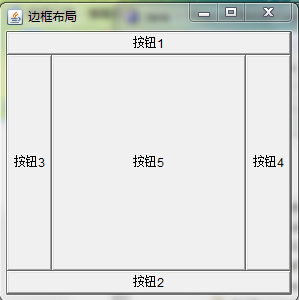
- BorderLayoutï¼ڑ边界ه¸ƒه±€ï¼Œوک¯Windowهڈٹه…¶هگ类类ه‹ه®¹ه™¨çڑ„é»ک认ه¸ƒه±€ç®،çگ†ه™¨م€‚
- ه¸ƒه±€و•ˆوœï¼ڑه°†و•´ن¸ھه®¹ه™¨èŒƒه›´هˆ’هˆ†وˆگEastم€پWestم€پSouthم€پNorthم€پCenterن؛”ن¸ھهŒ؛هںں,组ن»¶هڈھ能被و·»هٹ هˆ°وŒ‡ه®ڑçڑ„هŒ؛هںںم€‚
- هœ¨ن½؟用边界ه¸ƒه±€çڑ„ه®¹ه™¨ن¸ï¼Œç»„ن»¶çڑ„ه°؛ه¯¸ن¹ں被ه¸ƒه±€ç®،çگ†ه™¨ه¼؛è،Œوژ§هˆ¶ï¼Œهچ³ن¸ژه…¶و‰€هœ¨هŒ؛هںںçڑ„ه°؛ه¯¸ç›¸هگŒم€‚
- و¯ڈن¸ھهŒ؛هڈھ能هٹ ه…¥ن¸€ن¸ھ组ن»¶ï¼Œه¦‚هٹ ه…¥ه¤ڑن¸ھ,ه…ˆه‰چçڑ„组ن»¶ن¼ڑ被وٹ›ه¼ƒ
- ه½“ه®¹ه™¨çڑ„ه°؛ه¯¸هڈ‘ç”ںهڈکهŒ–و—¶ï¼Œه…¶ن¸هگ„组ن»¶ç›¸ه¯¹ن½چç½®ن¸چهڈک,ه°؛ه¯¸éڑڈو‰€هœ¨هŒ؛هںںè؟›è،Œç¼©و”¾è°ƒو•´ï¼›
è°ƒو•´هژںهˆ™ï¼ڑهŒ—م€پهچ—ن¸¤ن¸ھهŒ؛هںںهڈھ能هœ¨و°´ه¹³و–¹هگ‘缩و”¾(ه®½ه؛¦هڈ¯è°ƒ),ن¸œم€پè¥؟ن¸¤ن¸ھهŒ؛هںںهڈھ能هœ¨ه‚ç›´و–¹هگ‘缩و”¾(é«که؛¦هڈ¯è°ƒ),ن¸éƒ¨هŒ؛هںں都هڈ¯ç¼©و”¾م€‚
- و„é€ و–¹و³•
- public BorderLayout()
-
public BorderLayout(int hgap,int vgap) ï¼ڑو°´ه¹³ه’Œه‚ç›´é—´è·
- 5ن¸ھهŒ؛هںںï¼ڑ
- BorderLayout.EAST
- BorderLayout.WEST
- BorderLayout.SOUTH
- BorderLayout.NOUTH
- BorderLayout.CENTER
-
f.add(btnNorth,"North"); =f.add(BorderLayout.NOUTH);
import java.awt.*;
public class BorderLayoutDemo extends Frame {
Button bNorth,bSouth,bWest,bEast,bCenter;
public BorderLayoutDemo(){
super("è¾¹و،†ه¸ƒه±€");
bNorth = new Button("وŒ‰é’®1");
bSouth = new Button("وŒ‰é’®2");
bWest = new Button("وŒ‰é’®3");
bEast = new Button("وŒ‰é’®4");
bCenter = new Button("وŒ‰é’®5");
add(bNorth,"North");
add(bSouth,"South");
add(bWest,"West");
add(bEast,"East");
add(bCenter,"Center");
setBounds(200,200,300,300);
setVisible(true);
}
public static void main(String[] args){
new BorderLayoutDemo();
}
}
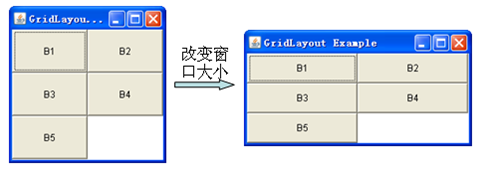
- GridLayoutï¼ڑ网و ¼ه¸ƒه±€
- ه¸ƒه±€و•ˆوœï¼ڑه°†ه®¹ه™¨هŒ؛هںںهˆ’هˆ†وˆگ规هˆ™çڑ„çں©ه½¢ç½‘و ¼ï¼Œو¯ڈن¸ھهچ•ه…ƒو ¼هŒ؛هںںه¤§ه°ڈ相ç‰م€‚组ن»¶è¢«و·»هٹ هˆ°و¯ڈن¸ھهچ•ه…ƒو ¼ن¸ï¼ŒوŒ‰ç»„ن»¶هٹ ه…¥é،؛ه؛ڈه…ˆن»ژه·¦هˆ°هڈ³ه،«و»،ن¸€è،Œهگژوچ¢è،Œï¼Œè،Œé—´ن»ژن¸ٹهˆ°ن¸‹م€‚
- è،Œو•°ن¸؛设置ه€¼ï¼Œهˆ—و•°هˆ™é€ڑè؟‡وŒ‡ه®ڑçڑ„è،Œو•°ه’Œه¸ƒه±€ن¸çڑ„组ن»¶و€»و•°و¥è؟›è،Œè°ƒو•´
- و£ه¸¸وƒ…ه†µن¸‹ن½؟用GridLayoutه¸ƒه±€و—¶ï¼Œهگ‘ه®¹ه™¨ن¸هٹ ه…¥çڑ„组ن»¶و•°ç›®ه؛”ن¸ژه®¹ه™¨هˆ’هˆ†ه‡؛و¥çڑ„هچ•ه…ƒو ¼و€»و•°ç›¸ç‰ï¼Œن½†هپ‡ه¦‚ه‡؛çژ°ن¸¤è€…و•°ç›®ن¸چç‰çڑ„وƒ…ه†µï¼Œç¨‹ه؛ڈن¹ںن¸چن¼ڑه‡؛错,而وک¯ن؟è¯پè،Œو•°ن¸؛设置ه€¼ï¼Œهˆ—و•°هˆ™é€ڑè؟‡وŒ‡ه®ڑçڑ„è،Œو•°ه’Œه¸ƒه±€ن¸çڑ„组ن»¶و€»و•°و¥è؟›è،Œè°ƒو•´م€‚
-
- و„é€ و–¹و³•
- public GridLayout()
- public GridLayout(int rows,int cols)
- public GridLayout(int rows,int cols,int hgap,int vgap)ï¼ڑè،Œو•°ï¼Œهˆ—و•°ï¼Œو°´ه¹³é—´è·ï¼Œه‚ç›´é—´è·ç¤؛ن¾‹
import java.awt.*;
public class GridLayoutDemo extends Frame {
Button[] b = new Button[5];
public GridLayoutDemo(){
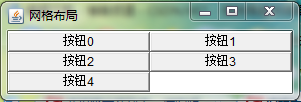
super("网و ¼ه¸ƒه±€");
for(int i=0; i<b.length; i++){
b[i] = new Button("وŒ‰é’®"+i);
}
setLayout(new GridLayout(3,2));
add(b[0]);
add(b[1]);
add(b[2]);
add(b[3]);
add(b[4]);
pack();
setSize(300,100);
setLocation(100,200);
//setBounds(200.100,300,100);
setVisible(true);
}
public static void main(String[] args) {
new GridLayoutDemo();
}
}pack()ï¼ڑوœ€ç´§ه‡‘çڑ„و ¼ه¼ڈو‘†و”¾
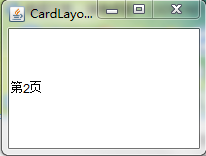
- CardLayoutï¼ڑهچ،片ه¸ƒه±€
- ه¸ƒه±€و•ˆوœï¼ڑه°†ه¤ڑن¸ھ组ن»¶هœ¨هگŒن¸€ه®¹ه™¨هŒ؛هںںه†…ن؛¤و›؟وک¾ç¤؛,相ه½“ن؛ژه¤ڑه¼ هچ،片و‘هœ¨ن¸€èµ·ï¼Œهڈھوœ‰وœ€ن¸ٹé¢çڑ„هچ،片وک¯هڈ¯è§پçڑ„م€‚
- و„é€ و–¹و³•
- public CardLayout()
- public CardLayout(int hgap, int vgap)
- ه…¶ن»–و–¹و³•
- public void first(Container parent)—وک¾ç¤؛第ن¸€ه¼ هچ،片
- public void last(Container parent)—وک¾ç¤؛وœ€هگژن¸€ه¼ هچ،片
- public void previous(Container parent)—وک¾ç¤؛ه‰چن¸€ه¼ هچ،片
- public void next(Container parent)—وک¾ç¤؛هگژن¸€ه¼ هچ،片
- public void show(Container parent,String name)ç؟»è½¬هˆ°وŒ‡ه®ڑهگچ称çڑ„组ن»¶ï¼Œè‹¥ن¸چهکهœ¨ن¸چهڈ‘ç”ںو“چن½œ
import java.awt.*;
public class CardLayoutDemo {
public static void main(String[] args) {
Frame f=new Frame("CardLayout Example");
CardLayout c1=new CardLayout();
f.setLayout(c1);
Label lbl[]=new Label[4];
for(int i=0;i<4;i++){
lbl[i]=new Label("第"+i+"é،µ");
f.add(lbl[i],"card"+i);
}
while(true){
try{
Thread.sleep(1000);
}catch(InterruptedException e){
e.printStackTrace();
}
c1.next(f);
}
}
}
- GridBagLayoutï¼ڑهٹ¨و€پçں©ه½¢هچ•ه…ƒç½‘و ¼
هˆ†ن؛«هˆ°ï¼ڑ


相ه…³وژ¨èچگ
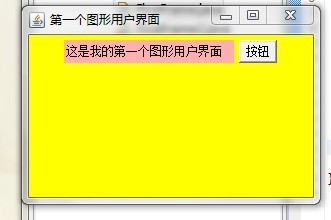
练ن¹ JAVA GUI设è®،ه’Œه¸ƒه±€è®¾è®،ï¼ڑç¼–ه†™ن¸€ن¸ھçھ—ن½“程ه؛ڈوک¾ç¤؛و—¥هژ†ï¼Œهڈھ需è¦پ设è®،GUI,ن¸چ需è¦پن؛‹ن»¶ه¤„çگ†م€‚
javaه›¾ه½¢ç¼–程ه®ن¾‹ï¼Œéه¸¸ه¥½çڑ„javaGUI编程ه…¥é—¨ç¨‹ه؛ڈم€‚
GUI javaو؛گç پ ه¤ڑç§چن¾‹هگ javaه¤§ه¦è¯¾ç¨‹
Javaèپٹه¤©è½¯ن»¶chat_src用ه®ڑهˆ¶çڑ„GUIه¼€هڈ‘
javaهڈچ编译ه·¥ه…·ï¼Œjd_guijavaهڈچ编译ه·¥ه…·ï¼Œjd_guijavaهڈچ编译ه·¥ه…·ï¼Œjd_guijavaهڈچ编译ه·¥ه…·ï¼Œjd_guijavaهڈچ编译ه·¥ه…·ï¼Œjd_guijavaهڈچ编译ه·¥ه…·ï¼Œjd_guijavaهڈچ编译ه·¥ه…·ï¼Œjd_guijavaهڈچ编译ه·¥ه…·ï¼Œjd_guijavaهڈچ编译ه·¥ه…·ï¼Œjd_gui...
javaه¸¸è§په¸ƒه±€çڑ„ن¾‹هگ,ه¯¹gui编程ه¾ˆوœ‰ه¸®هٹ©م€‚
0216_JavaGUI[ه½’ç±»].pdf
java ه›¾ه½¢ç•Œé¢çڑ„练ن¹ ,适هگˆو–°و‰‹ç»ƒن¹ ن½؟用
ه¾®ç›کن¸‹è½½çڑ„ SAP_GUI_730_JAVA_MAC
Windowsو“چن½œç³»ç»ںè‡ھه¸¦çڑ„è®،ç®—ه™¨وک¯ن¸ھه¾ˆو–¹ن¾؟çڑ„ه°ڈه·¥ه…·ï¼Œهˆ©ç”¨Javaçڑ„GUI编程,ه®çژ°ن¸€ن¸ھJava GUIè®،ç®—ه™¨ه؛”用程ه؛ڈç•Œé¢ï¼Œçھ—هڈ£و ‡é¢کن¸؛“è®،ç®—ه™¨â€ï¼Œçھ—هڈ£ه¸ƒه±€ه¦‚ن¸‹ه›¾و‰€ç¤؛,هœ¨و¤è®،ç®—ه™¨ه؛”用程ه؛ڈن¸ه®çژ°â€œ+م€پ-م€پ*م€پ/â€è؟گç®—و“چن½œ
(1)هˆ†هˆ«è؟گè،Œه·¥ç¨‹ن¸¤ن¸ھهŒ…ن¸çڑ„ن¸¤ن¸ھ.javaو–‡ن»¶ï¼ˆUploadClient.javaه’ŒUploadServer.java)هˆ†هˆ«ن¼ڑه¼¹ه‡؛“ن¸ٹن¼ ه®¢وœچ端â€ه’Œâ€œن¸ٹن¼ وœچهٹ،ه™¨â€ن¸¤ن¸ھçھ—هڈ£م€‚ (2)هچ•ه‡»â€œن¸ٹن¼ وœچهٹ،ه™¨â€çھ—هڈ£ن¸çڑ„“هگ¯هٹ¨وœچهٹ،..â€وŒ‰é’®م€‚ (3)هچ•ه‡»â€œن¸ٹن¼ ...
هٹں能é½گه…¨çڑ„ه¦ç±چç®،çگ†ç³»ç»ں,وک¯هˆ©ç”¨javaGUIهپڑçڑ„
è؟™وک¯ن¸€ن¸ھjava程ه؛ڈ,ه¸Œوœ›ه¤§ه®¶ه¥½ه¥½ه¦ن¹ ه“¦ï¼پ
java guiو•™ç¨‹,و¶µç›–ن؛†java guiçڑ„و‰€وœ‰ç»„ن»¶çڑ„هˆ›ه»؛هڈٹن؛‹ن»¶çڑ„هˆ›ه»؛说وکژ
java GUI编程,هڈ¯ن»¥ç¼–ه†™ه‡؛ن»»و„ڈن½ وƒ³è¦پçڑ„ç•Œé¢
هˆç؛§ه¦ن¹ 者ه؟…ه¤‡ï¼Œه¼€و”¾çڑ„guiو؛گن»£ç پ,ه¯¹ن؛ژن؛†è§£ه¦ن¹ 相ه…³çں¥è¯†هچپهˆ†وœ‰ç”¨م€‚
هˆ©ç”¨javaه®çژ°çڑ„GUI编程,هڈ¯ن»¥ç”¨و¥وµ‹è¯•م€‚
java çڑ„简هچ•ه؛”用,简هچ•çڑ„JavaGUI çڑ„ه؛”用
è¯è¨€ç¨‹ه؛ڈ设è®،资و–™ï¼ڑJAVA__SE_ه؛”用程ه؛ڈ设è®،__GUI程ه؛ڈ设è®،-و؛گن»£ç پ.doc
除ن؛†هٹ ه‡ڈن¹ک除ه¤–è؟که®çژ°ن؛†è®¸ه¤ڑçڑ„ه‡½و•°ï¼Œو¯”ه¦‚sin,cos,و±‚ه€’و•°ï¼Œن؛Œهچپè؟›هˆ¶è½¬وچ¢ç‰ï¼Œوک¯وˆ‘هچپه¤ڑه¤©çڑ„ه؟ƒè،€ï¼Œç¨‹ه؛ڈéه¸¸é•؟,ن¹ںوˆگهٹںه®çژ°ن؛†è®¾ه®ڑçڑ„هٹں能,وœ‰و¼‚ن؛®çڑ„用وˆ·ç•Œé¢ï¼Œé€ڑè؟‡è؟™ن¸ھ程ه؛ڈهڈ¯ن»¥ه¦هˆ°ه¾ˆه¤ڑه…³ن؛ژjava GUIه’Œè®،ç®—ه™¨çڑ„çں¥è¯†